Stain-in-Place Floors: How to Avoid Costly Mistakes
Your client has replaced their wood floors with stain-in-place wood. They look beautiful and are ready for stain samples.
As you know, wood is a tricky and temperamental beast. Beautiful with the right stain, but awful with the wrong. So, what’s a designer to do?
Here are my go-to tips for stain-in-place floors:
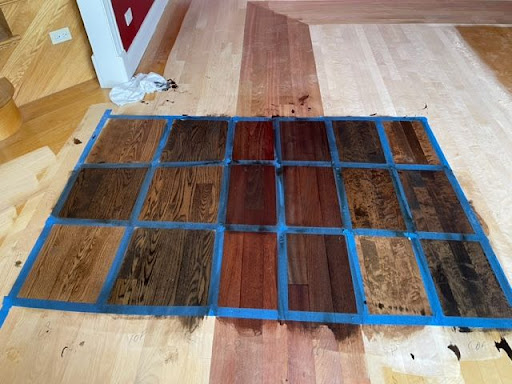
- Always test at least 5 samples – never less than 3. Even if the client thinks they want a dark espresso they may pivot once they actually see it on the floor.
- Test samples in two places- make sure one is in natural light, in front of a window and the other has less light. The chosen sample should look good in both areas.
- If you have different wood species make sure to test the stains on all of them since the stains will look very different on different species.
- Talk the client through the process of choosing, give your thoughts on the matter but make sure they are the ones to make the decision. This could come back to bite you if not.
Flooring contractors don’t love testing a bunch of samples but hold firm. This is when you have to be the voice of your client. If they aren’t loving any of the,m, work with the contractor to find the right mix of two to come up with the best option.
Make sure the client is present for the sampling. Then give it 24-48 hours. This is for a few reasons, stain colors will change as they dry. Good for them to see the full color as it will be. This also gives the client time to really know which color they want. They may have been saying that they wanted a dark floor, but once they live with it for a day or two, they change their mind.
Do you need personalized support while building your design business? That is exactly what you will receive as a member of MYDB (Manage Your Design Business), where you’ll learn to thrive as an interior designer.
Join the membership here!


